How to Set-Up Secondary Domains for Effective Cold Email?
On this page
It goes without saying that cold email outreach is a valuable outbound strategy to connect with your prospects. However, achieving a high deliverability rate and protecting your sender reputation at the same time can be challenging. This is where you can use a secondary domain.
NEW: SmartReach.io now offers authenticated domains for just $5/month and authenticated email addresses for only $3/month! (Learn More)
This significantly reduces the cost and complexity of maintaining high-volume cold email campaigns. You can now purchase Google, Outlook, and Maildoso domains and emails directly within SmartReach.io with full authentication (SPF, DMARC, etc.) already set up, no email infrastructure expertise required!
This article describes the advantages of secondary domain for cold outreach, guiding you through the setup process, and offering valuable tips to maximize your deliverability and campaign effectiveness.
So let’s start with the basics.
What is a secondary domain?
A secondary domain is an additional domain name that you can connect to your existing web hosting or email service provider account to protect the reputation of your primary domain.
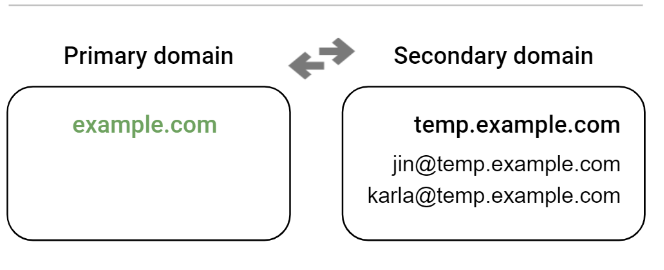
To make it more detailed, the secondary domain generally refers to the following:
- Second-Level domains (SLDs): The most common interpretation of a secondary domain is the second-level domain itself. For example, in example(.)com, an example is the secondary domain to the .com TLD.
- Additional domain under a primary domain: In organizational contexts, secondary domain can refer to additional domain that an organization manages under its primary domain for different purposes. For instance, a company with example(.)com might also own example(.)org, example(.)net, or example(.)biz. These are separate, fully qualified domain names but can be considered secondary to the main example(.)com domain.
- Domain aliases: Sometimes, organizations use secondary domain as aliases for their primary domain. For instance, company-brand.com might redirect to company.com.
Example Scenario
Consider a company, TechCorp, with the primary domain techcorp.com. Here’s how they might use secondary domain:
- SLD as Secondary Domain: techcorp.net and techcorp.org are secondary domain that the company owns to protect its brand.
- Subdomain as Secondary domain: Within techcorp.com, they might have support.techcorp.com for customer support and blog.techcorp.com for their blog.
- Regional Secondary domain: They use techcorp.co.uk for operations in the UK.
Why do you need a secondary domain in cold outreach?
In cold outreach, a secondary domain is often used strategically to improve email deliverability, maintain brand reputation, and manage campaigns more effectively.
Here are the #7 key reasons for using a secondary domain in cold outreach:
👉 Protecting Primary Domain Reputation
Cold outreach, especially via email, can sometimes be perceived as spam by recipients’s email service providers (ESPs). Using a secondary domain helps protect the reputation of the primary domain from being blacklisted.
If an outreach campaign triggers spam filters or results in complaints, the secondary domain can absorb the negative impact without affecting the primary domain’s deliverability and reputation.
👉 Improving Email Deliverability
A secondary domain can help improve the deliverability of cold emails by:
- Using different domains for different campaigns or segments allows for more granular management of email-sending practices and reputation.
- New secondary domain can be “warmed up” gradually by sending a small volume of emails initially, then increasing the volume over time to establish a positive sending reputation with ESPs.
Suggested: Email Sender Reputation | Everything You Need To Know About
👉 Campaign Management and Tracking
The secondary domain provides a clear way to differentiate and manage multiple outreach campaigns. This helps in:
- Tracking and measuring the performance of each campaign separately when they are associated with distinct domain.
- Running A/B tests across different domains can help determine which strategies yield the best results.
👉 Flexibility in Experimentation
Using the secondary domain allows for greater flexibility in experimenting with different outreach approaches without risking the main domain. This includes:
- Different email content, subject lines, and approaches can be tested on a secondary domain.
- Outreach emails can be sent from different identities (e.g., sales@secondarydomain.com vs. marketing@secondarydomain.com) to see which resonates more with recipients.
👉 Avoiding Domain Blacklisting
In the event that an email campaign results in the secondary domain being blacklisted by ESPs or spam filters, the primary domain remains unaffected. This isolation allows businesses to continue their main operations and communications without interruption.
👉 Improved Security and Privacy
Secondary domain can add a layer of security and privacy by:
- Keeping outreach activities separate from main business operations reduces the risk of exposing primary domain-related data.
- Different teams or external agencies can be given access to secondary domain without granting them access to the primary domain.
How to set up a secondary domain for cold emails?
This section will provide a step-by-step guide on setting up a secondary domain, covering both manual and automated methods.
✅ Process 1: Manual process
The manual process includes the below steps:
- Step 1: Domain Registration
- Step 2: DNS Configuration
- Step 3: Email Hosting Setup
- Step 4: Integration with Outreach Tool
- Step 5: Warm-Up Process
Step 1: Domain Registration
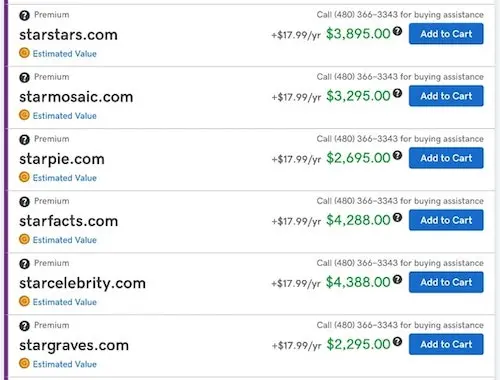
Credits: GoDaddy
Setting up a secondary domain for cold email outreach requires acquiring a new domain name separate from your primary domain.
Here’s what you need to consider during domain registration:
Choosing the Right Domain Name
Opt for a clear, memorable name that’s relevant to your outreach campaign but distinct from your main domain. Prioritize common extensions like .com, .org, or .net for better trust compared to free or less common ones. Use the domain registrar’s search tool to confirm its availability.
Domain Registrar Selection
Popular choices include Google domain, Namecheap, GoDaddy, and others. Consider factors like pricing, registration fees, domain privacy protection options, and customer support. Some ESPs (Email Service Providers) might also offer bundled domain registration with email hosting plans.
Things to Check During Registration
Ensure the desired domain name is truly available. Be aware of the initial registration fee and any recurring renewal costs. Consider adding domain privacy protection to shield your personal contact information from public WHOIS searches. Finally, review the terms of service for any restrictions on using the domain for email outreach.
Step 2: DNS configuration
DNS configuration is to translate human-readable domain names into machine-readable IP addresses. This essentially acts like an internet phonebook.
To ensure email deliverability and protect against spoofing, you’ll need to configure additional records for email authentication: SPF, DKIM, and DMARC.
Here’s a detailed explanation of each and how to set them up:
- Access DNS Management: Log in to your domain registrar’s account and navigate to the DNS management section for your domain.
- Set Up SPF Record: SPF (Sender Policy Framework) helps prevent email spoofing by specifying which mail servers are allowed to send emails on behalf of your domain.
-
Steps:
- Add a new TXT record.
- In the “Host” field, enter @ to apply the record to the root domain.
- In the “TXT Value” field, enter your SPF record, which might look something like: v=spf1 include: example(.)com ~all. This record specifies that example(.)com’s mail servers can send emails for your domain.
- Set Up DKIM Record: DKIM (DomainKeys Identified Mail) ensures that the content of your emails has not been altered in transit by adding a digital signature.
-
Steps:
- Generate a DKIM key pair (public and private keys) through your email provider or a DKIM key generator.
- Add a new TXT record.
- In the “Host” field, enter the DKIM selector followed by ._domainkey, e.g., selector1._domainkey.
- In the “TXT Value” field, paste the public key provided or generated. It will look something like: v=DKIM1; k=rsa; p=MIGfMA0GCSqGSIb3DQEBAQUAA4GNADCBiQKBgQD2p3….
-
Set Up DMARC Record: DMARC (Domain-based Message Authentication, Reporting & Conformance) tells receiving mail servers what to do if an email fails SPF or DKIM checks and provides a way to receive reports about email authentication and delivery.
-
Steps:
- Add a new TXT record.
- In the “Host” field, enter _dmarc.
- In the “TXT Value” field, enter your DMARC policy, e.g., v=DMARC1; p=none; rua=mailto:dmarc-reports@yourdomain.com;. This policy requests a report if an email fails authentication checks but does not yet instruct the receiving server to reject or quarantine such emails.
-
- Verify DNS Settings: After adding the SPF, DKIM, and DMARC records, verify the settings using tools like MXToolbox or your email provider’s DNS diagnostic tools to ensure they are correctly configured and propagate properly across the DNS system.
Too confused with the steps?
Check out the tutorial below on how to set-up DNS records on Godaddy. (Video time-stamp starting from 00.48).
It doesn’t matter if you use some other web hosting provider, the steps will be mostly the same.
Step 3: Email Hosting Setup
Setting up email hosting for your secondary domain involves choosing an email service provider, configuring the domain, and creating necessary email accounts. Here’s a detailed breakdown:
A. Choose an Email Service Provider
Select an email service provider that fits your needs. Popular options include:
- Google Workspace (formerly G Suite): Offers professional email, cloud storage, and collaboration tools.
- Microsoft 365: Provides email hosting along with Office apps and cloud services.
- Zoho Mail: A cost-effective solution with a suite of productivity tools.
- ProtonMail: Known for its emphasis on security and privacy.
Recommended Read: What is SMTP? The Complete Guide
Tip: I’d personally recommend using Outlook by Microsoft 365 for the best email deliverability and security.
We have covered the top ESPs in detail in our article “8 Best FREE Email Service Providers | Create Free Emails”. Check it out!
B. Sign Up and Configure Domain
After selecting a provider, sign up for their email hosting service. Follow these steps to configure your domain:
- Domain Verification: Prove ownership of your domain by adding a TXT or CNAME record to your DNS settings. The provider will give you specific instructions on what values to enter.
- MX Records Setup: Mail Exchange (MX) records direct emails to your email servers. Update your DNS settings with the MX records provided by your email host.
- SPF, DKIM, and DMARC Records: Ensure you add or update SPF, DKIM, and DMARC records as part of email authentication (as previously detailed in the DNS Configuration step).
Here’s a step-by-step Google Workspace setup that you can follow.
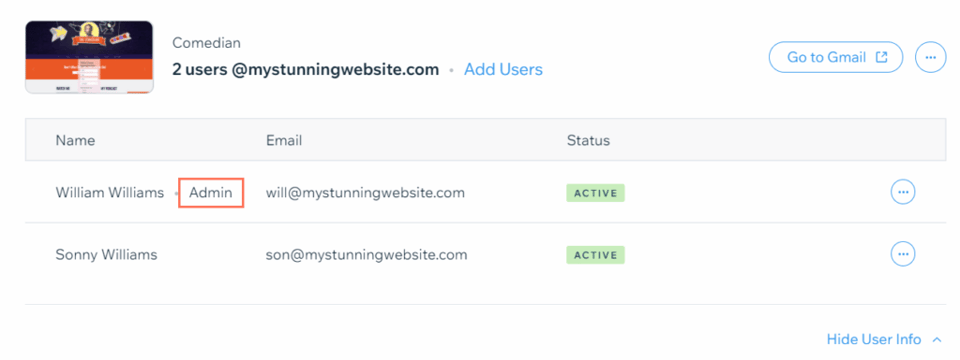
C. Create Email Accounts
Once your domain is verified and MX records are set, proceed to create email accounts. This typically involves:
- Admin Account: Set up an admin account to manage other users and settings.
- User Accounts: Create individual email accounts for your team members. For example, you might create accounts like john@secondarydomain.com, sales@secondarydomain.com, etc.
- Aliases and Groups: Set up email aliases and distribution groups if needed. An alias like info@secondarydomain.com can forward emails to multiple users.
Once set-up it look like this on Google Workspace 👇
D. Configure Email Clients
Set up your email clients (such as Outlook, Thunderbird, or mobile email apps) to access the new email accounts. Typically, you’ll need:
- Incoming Server Settings: IMAP or POP settings provided by your email host.
- Outgoing Server Settings: SMTP settings to send emails.
- Login Credentials: Username and password for each email account.
Read more: How to Configure Gmail SMTP Settings? The Complete Guide
Step 4: Integration with Outreach Tool
Now that you’ve set up your email account for cold emailing, the next step is integrating a cold outreach platform. Today, we’ll discuss connecting with SmartReach.io, a leading AI-enabled sales engagement platform renowned for its wide range of features tailored for B2B sales.
How SmartReach.io helps in cold outreach:
SmartReach.io offers a suite of features that can help with your cold email outreach, such as —
- Campaign Management: Create, manage, and schedule your cold email campaigns within the SmartReach.io platform.
- Personalization: Personalize your email templates with dynamic fields to insert recipient names, company details, and other triggers. Using merge tags, spintax, AI-content writer, etc. to write personalized email copies.
- Email Sequences: Design automated email sequences with follow-up emails to nurture leads generated through your cold outreach.
- Tracking and Reporting: Monitor campaign performance with detailed analytics on open rates, click-through rates, and replies. Identify what’s working and adjust your strategy accordingly.
- Team Collaboration: Collaborate with team members within SmartReach.io to manage tasks, assign leads, and share campaign progress.
- Inbox Rotation: add unlimited email accounts within a single campaign to scale and improve deliverability rate.
- Free Email Validation: get unlimited email free validation (which other tools do not provide), reducing the spam rate and the bounce rate.
Step 5: The Warm-Up Process
After integrating your secondary domain with your outreach tool, the final step before launching full-fledged cold email campaigns is the warm-up process.
This involves gradually increasing your sending volume to establish a positive sender reputation with email providers.
You can use warm-up hero for unlimited email warm-ups on complete automation.
Tip: It’s recommended that you put your sending emails on warm-up for at least 2 weeks, before adding them to a campaign.
Here’s how Warmup Hero helps in the email warm-up process
Warmup Hero offers a dedicated platform specifically designed for email warm-up. It can help you in.
- Gradual Sending Increase: Set your desired email volume and let Warmup Hero gradually increase daily sends, mirroring natural patterns to avoid suspicion.
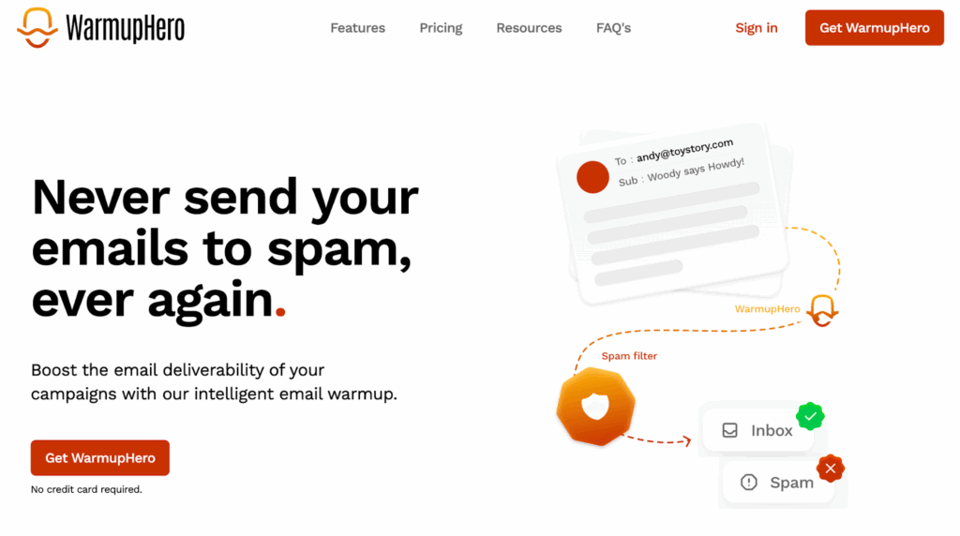
- Spam Trap Detection: Integrated spam trap databases remove invalid emails, preventing bounces and safeguarding your sender’s reputation.
- Detailed Reporting: Track warm-up progress with comprehensive reports on sending volume, open rates, and bounce rates to gauge sender reputation improvement.
✅ Process 2: Using Automated tools
While Email Infrastructure Tools (EITs) can’t fully create a secondary domain for cold outreach on their own, they can significantly automate and simplify specific steps in the process.
| Aspect | What EITs Can’t Automate | What EITs Can Automate |
| Domain Registration | Purchasing a domain name typically requires manual interaction with a domain registrar like Google Domain or Namecheap. | Certain EITs might integrate with domain registrars, allowing you to initiate domain purchases within the EIT platform (availability of this feature can vary). |
| Complete DNS Configuration | Although some EITs offer pre-configured templates, you might still need to manually add or edit specific DNS records (like SPF, DKIM, DMARC) depending on the tool’s capabilities. | Some EITs provide pre-configured templates for email authentication records (SPF, DKIM, DMARC). This reduces manual configuration steps compared to setting them up entirely from scratch. |
| Email Account Creation | N/A | Once your domain is linked, EITs typically allow you to easily create email addresses specific to your cold outreach campaign. |
However, the steps involved in automated secondary domain creation are:
- Step 1: Choose an Email Infrastructure Tools (EIT)
- Step 2: Domain Registration & email account
- Step 3: Connect Your Domain
- Step 4: Configure DNS Settings
Step 1: Choose an Email Infrastructure Tool (EIT)
Several Email Infrastructure Tools (EITs) can significantly simplify the process. These tools offer features that streamline various aspects of your outreach, allowing you to focus on crafting impactful messages.
Here’s how EITs can enhance your cold email workflow:
Firstly, EITs often provide a bundled suite of services crucial for success. This includes email hosting, the foundation for sending and receiving emails from your secondary domain.
Some EITs, like G Suite in specific regions, even offer domain registration within their platform, eliminating the need for a separate registrar and keeping everything centralized.
Secondly, many EITs integrate powerful outreach functionalities. These can include tools for managing and segmenting your email lists to ensure targeted outreach. You can create personalized email templates with dynamic fields and automate follow-up email sequences to nurture leads.
Additionally, real-time campaign tracking and analytics allow you to monitor key metrics and optimize your strategy based on performance.
By choosing an EIT with these bundled services, you can experience several advantages. Simplified domain management (if offered) allows you to purchase and connect your secondary domain within the EIT platform, eliminating the need to juggle multiple tools.
Examples of some of the top EITs:
- Mailmodo: This EIT focuses on cold email outreach and integrates with popular email providers for email hosting. It offers features like list management, email sequencing, and real-time campaign analytics.
- Mailoso: Streamline domain management and email account creation with Mailoso. It offers dedicated tools for warming up your domain to improve email deliverability, a crucial aspect of cold email success.
- Mailforge: This EIT provides email-sending capabilities, list management tools, and real-time campaign tracking to help you execute successful cold email campaigns.
Step 2: Domain Registration & email account
Domain Registration:
Some EITs, like mailmodo, mailforge, etc, offer domain registration directly within their platform. This eliminates the need for a separate domain registrar, simplifying the process.
- You can search for available domain names and purchase them directly through the EIT interface.
- Payment processing is typically integrated, making the purchase seamless.
Email Account Creation:
- Once your domain is linked to the EIT, creating email accounts specifically for your cold outreach campaign becomes effortless.
- The EIT platform will typically offer a user-friendly interface for creating email addresses. You can specify the desired username (e.g., [firstname].[lastname]) and choose from various email account options offered by the EIT.
Step 3: Connect Your Domain
While this might seem like a technical hurdle, EITs offer features that significantly simplify the process compared to manual configuration.
Here’s how EITs streamline domain connection:
Clear Instructions and User Interfaces:
- Most EITs provide clear and step-by-step instructions within their platform to guide you through the domain connection process.
- These instructions often include screenshots or video tutorials for added clarity.
- The user interface itself is typically designed to be intuitive, allowing you to easily navigate the connection steps.
Integration with Popular Domain Registrars:
Many EITs integrate with popular domain registrars like Google Domain, Namecheap, or GoDaddy. This integration can simplify the process by potentially allowing you to manage certain aspects of domain connection directly within the EIT interface.
Step 4: Configure DNS Settings
While it might sound complex, Email Infrastructure Tools (EITs) can significantly simplify this step compared to manual configuration. Here’s how:
Understanding DNS Settings:
- DNS (Domain Name System) acts like a phonebook for the internet, translating your domain name (e.g., yourcompany.com) into an IP address that computers can understand.
- For cold email outreach, you need to configure specific DNS records to ensure emails arrive in inboxes and avoid spam filters.
Tips for better email deliverability
Some tips to keep in mind for improving your deliverability. You might already be aware of some points but still mentioning them below for your quick reference.
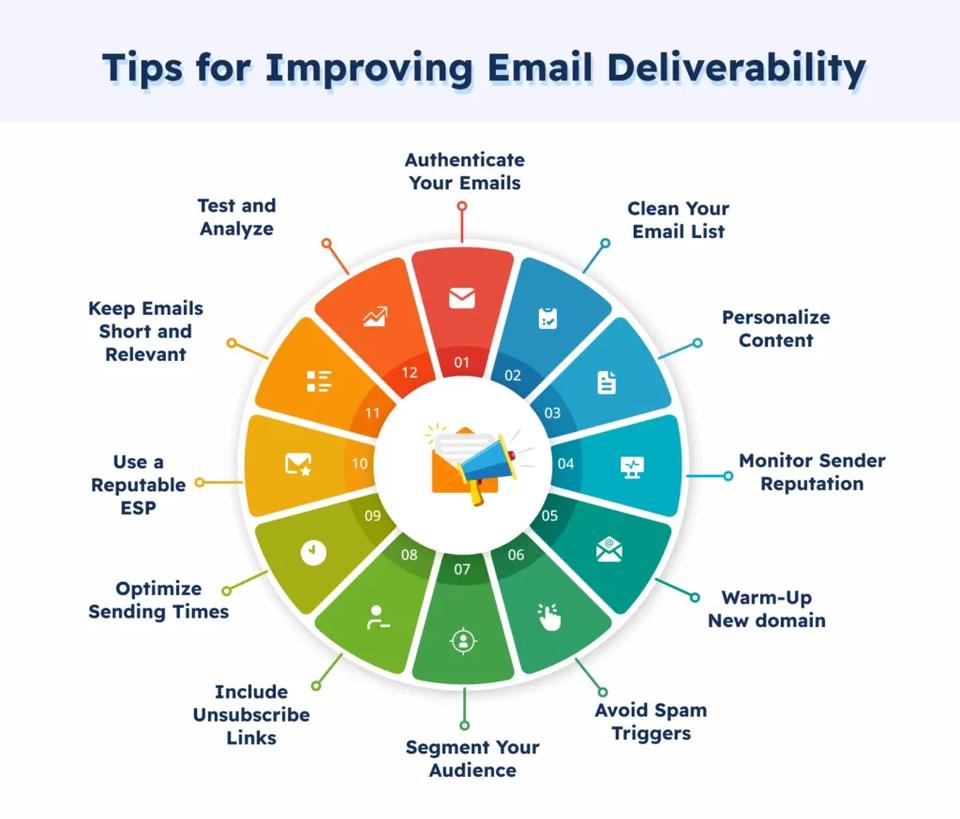
- Authenticate Your Emails: Use SPF, DKIM, and DMARC to verify your email’s authenticity.
- Clean Your Email List: Regularly remove invalid or inactive email addresses.
- Personalize Content: Tailor emails to recipients’ interests to increase engagement.
- Monitor Sender Reputation: Use tools to track your domain’s sending reputation.
- Warm-Up New domain: Gradually increase the volume of emails sent from the new domain.
- Avoid Spam Triggers: Steer clear of spammy language and excessive punctuation.
- Segment Your Audience: Target emails based on recipient behavior and demographics.
- Include Unsubscribe Links: Make it easy for recipients to opt out.
- Optimize Sending Times: Send emails when recipients are most likely to engage.
- Use a Reputable ESP: Choose a reliable Email Service Provider with good deliverability rates.
- Keep Emails Short and Relevant: Ensure your content is concise and to the point.
- Test and Analyze: Regularly A/B test email campaigns and analyze performance.
- Engage Inactive Users: Periodically try to re-engage inactive subscribers or remove them.
- Provide Clear Sender Information: Ensure your emails have a recognizable sender name and email address.
- Follow Legal Requirements: Adhere to laws like CAN-SPAM and GDPR for compliance and trustworthiness.
Recommended Read: How to Improve Email Deliverability?
Scale your cold outreach using SmartReach.io
Scaling your cold outreach using SmartReach.io involves leveraging its suite of tools and features designed to enhance your outreach efficiency, effectiveness, and engagement.
Here’s how you can scale your outreach with SmartReach.io:
Automate email warm-up: SmartReach users get free email warm-up for better deliverability, as mentioned above.
Automate Email Sequences: Create and automate personalized email sequences to engage prospects over time, saving manual effort and ensuring consistent follow-ups.
Utilize Multichannel Outreach: Combine emails with other communication channels like SMS, LinkedIn, WhatsApp and calls, enhancing your outreach strategy and increasing engagement rates.

Optimize Send Times: Automate scheduling with SmartReach.io’s intelligent send time optimization, ensuring your emails are sent when recipients are most likely to engage.
Monitor and Analyze Performance: Take advantage of detailed analytics and reporting tools to track open rates, click-through rates, and response rates, allowing you to refine and optimize your campaigns continually.
Integrate with CRMs: Seamlessly integrate with popular CRM systems like Salesforce, HubSpot, or Pipedrive to synchronize your contacts, track interactions, and streamline your sales workflow.
Use Inbox Rotation: Using secondary email domain in inbox rotation with the option to add unlimited email accounts in a campaign is a powerful strategy to enhance deliverability and scale outreach without violating sending limits of ESPs..
By using multiple secondary domains, you spread out the email-sending load, significantly reducing the risk of any single domain being flagged as spam. This approach ensures a consistent sending reputation across various domains and email accounts, which improves overall inbox placement rates.
A/B Testing: Conduct A/B tests on email subject lines, content, and sending times to identify the most effective strategies and improve your outreach outcomes.
You might be feeling overwhelmed by now by reading about all these features!
Why don’t you try SmartReach to get a fast-hand experience of all its features and functionalities?
You can try SmartReach for 14 days for free (No Credit Card required) or even schedule a 15-minute call to see if it fits your specific use case.
Frequently Asked Questions (FAQs)
1. What is a secondary domain and why use it for cold outreach?
A secondary domain is an additional domain separate from your main business domain, used specifically for sending cold emails. It protects your primary domain’s reputation while allowing you to run outreach campaigns safely.
2. How does a secondary domain improve deliverability?
Using a secondary domain keeps your main domain free from potential spam flags. It also lets you warm up and maintain a clean sending reputation for higher inbox placement.
3. What are the steps to set up a secondary domain for cold emails?
Buy a domain, set up custom email addresses, configure DNS records (SPF, DKIM, DMARC), gradually warm up the domain, and then integrate it with your outreach tool.
4. What are some tips for better cold email deliverability?
Authenticate your domain, send emails gradually, personalize your content, avoid spam-trigger words, maintain a healthy prospect list, and monitor bounce and reply rates.
5. What is an example of a secondary domain?
If your main domain is company.com, a secondary domain could be company.co or getcompany(.)com, something similar but not identical.
6. What is a secondary domain for cold email?
It’s a domain used exclusively for sending cold outreach emails to protect the main domain’s sending reputation.
7. What is the best domain for cold emails?
The best domains are short, relevant to your brand, easy to type, and not spammy. Choose a clean domain extension like .com, .io, or .co.
8. How to create a secondary domain?
Purchase a domain from a registrar (like Google Domains or Namecheap), set up email hosting, and configure authentication before using it.
9. Does Google charge for secondary domains?
Yes. Google charges separately for additional domains and associated email accounts under Google Workspace.
10. What is the second-level domain rule?
A second-level domain is the part of a domain name directly to the left of the top-level domain (TLD). For example, in example.com, “example” is the second-level domain.
11. What is the difference between a subdomain and a second-level domain?
A second-level domain sits directly under the TLD (like example.com), while a subdomain is a prefix added to it (like mail.example.com).
12. How much is too much to pay for a domain?
Most standard domains cost $10 to $30 per year. Paying hundreds or thousands is only reasonable if the domain has high value, strong branding potential, or competitive demand.

Stop juggling tools
Book more meetings on every channel
Join 5,000+ teams running multichannel outreach from one sequence, with deliverability built in.