![]()
How to Set Up Email Headers for Better Deliverability?
Cold emails often go unanswered, not because of poor messaging, but because they never reach the inbox.
In one case, our SDR team saw response rates drop from 8% to 2% overnight.
After ruling out copy and targeting issues, we traced the problem to an email domain setting update.
The email authentication headers hadn’t been reconfigured. Once fixed, deliverability rebounded within 48 hours.
Email headers act as authentication checkpoints. When properly set up, they help ensure emails land in inboxes, not spam folders.
Misconfigurations, on the other hand, silently block outreach efforts and stall pipeline growth.
In this blog, we will check how to set the email headers properly.
What are email headers, and why do they impact deliverability?
Email headers are technical elements attached to every email that help verify the sender’s identity.
When email headers like SPF, DKIM, and DMARC are misconfigured or missing, email providers may block or filter your outreach, even if the content is solid. In some cases, deliverability can drop from 90% to 20%, meaning most prospects never see your email.
These authentication protocols work together to signal that your email is safe and trustworthy. Proper configuration improves inbox placement and boosts response rates.
👉 Read the full guide on how email headers affect deliverability
Key email headers that impact deliverability
Sales teams must get these six headers right to ensure cold emails land in inboxes:
- SPF: Verifies which IPs are allowed to send emails from your domain. Without it, your emails look suspicious, especially to industries with strict security like finance and manufacturing.
- DKIM: Adds a digital signature to confirm the email wasn’t tampered with. Missing DKIM = higher chances of being flagged as spam.
- DMARC: Tells providers how to handle failed SPF or DKIM checks (deliver, quarantine, or reject). Without it, you lose control over how your emails are treated.
- Return-Path: Directs bounced emails. Mismatches can hurt your sender reputation and trigger spam filters.
- Reply-To: Should align with your domain’s authentication. Mismatches can confuse both mail servers and prospects.
- Message-ID: Each email must have a unique ID. Duplicates can trigger spam detection, especially in large-scale outreach.
Even one misconfigured header can tank your campaign. Get these right to protect your deliverability.
How to check if your email headers are correctly configured?
Even the best email copy won’t work if your headers are misconfigured.
Here’s a simple 5-step process to verify if your email headers are set up correctly and ensure your cold emails are reaching inboxes:
Step #1: Send a test email
Start by sending an email from your outreach tool to a personal Gmail or Outlook account.
This helps you review how your emails appear on the receiving end, just like a prospect would see them.
Step #2: View the full email headers
Depending on your email client, the steps to view full headers may vary (here are some most preferred ones):
- Gmail: Open the email → Click the three-dot menu (⋮) in the top-right → Select “Show original”
- Outlook (Web): Open the email → Click “More actions (⋯)” → Choose “View message details”
- Outlook (Desktop App): Double-click the email → Go to File > Properties → Look under Internet headers
- Apple Mail (Mac): Open the email → Click “View” in the top menu → Choose “Message” > “All Headers”
- Yahoo Mail: Open the email → Click the three-dot menu (⋮) → Select “View raw message”
- Zoho Mail: Open the email → Click “More actions” (⋯) → Choose “Show original”
These steps will reveal the full header information including SPF, DKIM, and DMARC results key details that email servers use to decide whether to trust and deliver your email.
Step #3: Analyze using online tools
Use tools like MXToolbox Header Analyzer or Google’s Email Header Analyzer to review the headers.
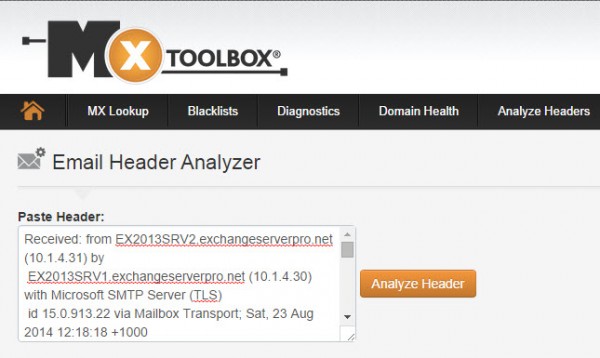
These tools break down your SPF, DKIM, and DMARC status, and flag any misconfigurations.
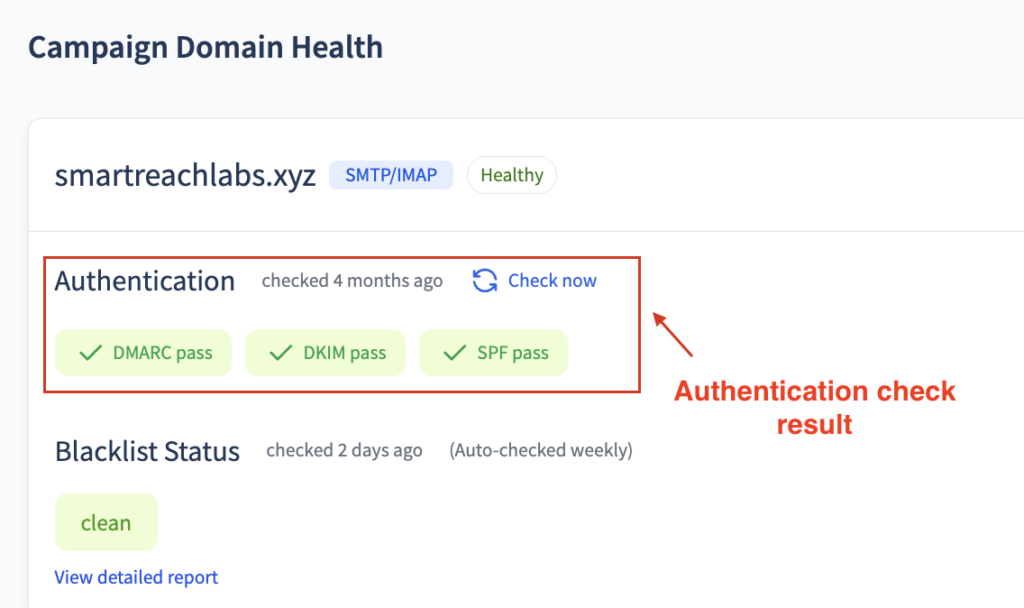
Step #4: Check authentication results
Look for lines starting with ‘Authentication-Results’:
You’re aiming for:
- SPF=PASS
- DKIM=PASS
- DMARC=PASS
If any of these show as FAIL or NONE, there’s an issue that needs to be fixed before running campaigns.
Step 5: Verify domain alignment
Your “From” domain must match the domains used in your SPF and DKIM records.
Misalignment often causes deliverability issues even when SPF and DKIM individually pass.
Red flags to watch out for:
- Missing SPF records – high spam risk
- DKIM failures – mail appears tampered
- No DMARC policy – no control over failed emails
- Domain mismatches – trigger provider distrust
- Generic message IDs – looks automated or suspicious
💡 Pro Tip:
Industries like manufacturing, BFSI (banking, financial services, and insurance), and healthcare often have stricter email security filters. For teams targeting these sectors, flawless header configuration isn’t optional—it’s mission-critical.
Fix common email header issues in #7 simple steps
Once you’ve identified header issues, follow this streamlined approach. Most fixes involve DNS updates and take 4–6 hours in total.
1. Fix SPF records
- Ask your IT team to update your DNS with the correct SPF record.
- Ensure it includes all tools/platforms sending emails on your behalf (e.g., SmartReach, Google Workspace).
- Use SmartReach’s setup wizard to get pre-filled SPF values.
2. Set up DKIM
- DKIM adds a digital signature to authenticate your emails.
- Your email platform typically handles this. If not:
- Generate DKIM keys
- Add the public key to your DNS
- Generate DKIM keys
- SmartReach auto-validates DKIM setup before sending campaigns.
3. Configure a DMARC policy
- Start with: p=none (monitoring mode)
- Once stable, switch to: p=quarantine or p=reject for protection
- Add your DMARC record to DNS with proper policy instructions.
4. Align domains
- Ensure these match:
- From address domain
- SPF domain
- DKIM domain
- From address domain
- Misaligned domains confuse email filters and impact deliverability.
5. Fix return-path issues
- Should use the same domain as your “From” address.
- Most cold email tools (like SmartReach.io) help configure this.
- Still, double-check for consistency.
6. Collaborate with your IT team
- Most fixes require DNS-level changes.
- Share exact records and setup guides from your email platform.
- Always document the changes for future reference or troubleshooting.
7. Test after fixes
- Wait 24–48 hours for DNS changes to propagate.
- Re-run tests using header analyzers (e.g., MXToolbox).
- Look for SPF, DKIM, DMARC = PASS.
- Spot-check domain alignment and return-path consistency.
Recommended read: How to set up SPF, DKIM & DMARC to keep emails out of spam
5 Email header mistakes that can ruin your email campaign
Avoid these frequent missteps that can tank your cold email performance:
1. Using personal email domains (@gmail, @yahoo)
- Problem: No ability to set up SPF/DKIM.
- Impact: Emails look untrustworthy and often land in spam. Prospects—especially in B2B—don’t take them seriously.
2. Mismatched authentication domains
- Problem: “From” address doesn’t match DKIM/SPF domains.
- Impact: Triggers spam filters and damages sender reputation.
3. No DMARC policy
- Problem: No instructions for handling failed authentication.
- Impact: Leads to unpredictable deliverability and makes sales forecasting unreliable.
4. Poor shared IP reputation
- Problem: Other users on your provider’s IP may be sending spam.
- Impact: Your emails suffer even with perfect headers.
5. Not updating headers after domain or provider changes
- Problem: Old SPF/DKIM settings don’t match new setup.
- Impact: Sudden drop in deliverability and lost pipeline opportunities.
How can SmartReach.io enhance your email deliverability?
SmartReach.io is an AI-powered sales engagement platform, that helps your team scale their outreach efforts.
SmartReach offers a full suite of email deliverability features designed to give your cold outreach the best shot at success.

From automatic inbox warm-ups and spam word detection to global blacklist monitoring, SmartReach works at the backend to protect your sender reputation.
It also matches your sending provider with your prospect’s ESP to avoid unnecessary red flags.
While SmartReach doesn’t set up SPF, DKIM, or DMARC for you, it does play a key role in identifying issues. If your authentication setup is missing or incorrect, SmartReach highlights it in its detailed spam report, so you catch deliverability issues before they impact your campaigns.
If you’re serious about getting your emails seen (and replied to), start your 14-day free trial and see the difference SmartReach can make to your outreach results.
FAQs on setting email headers correctly
How to make a good email header?
To create a good email header, ensure your SPF, DKIM, and DMARC authentication records are correctly configured. Use a professional sender domain, a consistent reply-to address, and a unique message ID. These steps improve inbox placement and email credibility.
How to validate email headers?
You can validate email headers by sending a test email and analyzing it using tools like MXToolbox or Google’s Email Header Analyzer. These tools check your SPF, DKIM, and DMARC status and flag any misconfigurations.
How do I inspect an email header?
Open the email and look for options like “View Original,” “Show Source,” or “View Message Headers,” depending on your email provider (Gmail, Outlook, Yahoo, etc.). This will show the full header data including authentication results.
How to set email headers?
Email headers are typically set at the domain level through DNS records (SPF, DKIM, DMARC) and by your email service provider. Work with your IT team or email platform to configure them correctly via your domain registrar’s DNS settings.
How to make a header look good?
If you’re referring to visual headers in email templates, use clean branding elements, a responsive layout, and consistent fonts. Keep it visually appealing but lightweight to avoid spam filters.
How to validate a request header?
In web development, request headers can be validated using backend tools or scripts to check for required fields, authorization tokens, or content types. Tools like Postman or browser developer tools help inspect and validate headers.
How do I check email headers in DKIM?
Inspect your email header and find the Authentication-Results section. Look for a line showing “dkim=pass.” If it says “fail” or “none,” your DKIM record may be misconfigured and needs attention.
How do I check my header?
Send yourself an email and open the message source in your inbox. Look for authentication lines like SPF, DKIM, and DMARC under Authentication-Results. You can also paste the header into online analyzers for insights.
How to design an email header?
To design a visual email header (the top section of your email template), use branding elements like your logo, brand colors, and a clean layout. Make it mobile-friendly, not too heavy, and always optimized for fast load times.